
In this walkthrough, you will learn how to add a FactBox to the customer list page and use it to display credit information about the selected customer. FactBoxes are pages that you can create and then use within another page to display targeted, related information about a selection.
 About this Walkthrough
This walkthrough provides an overview of how to add a FactBox to another page in Microsoft Dynamics NAV 2009, and demonstrates how to:
-
Create a FactBox page.
-
Add fields to the FactBox.
-
Add the FactBox to the customer list page.
-
Associate the selection in the customer list with the information displayed in the FactBox.
Prerequisites
This walkthrough builds on the steps described in Walkthrough: Creating a Customer List in Page Designer and Walkthrough: Adding Actions to a Customer List Page.
Story
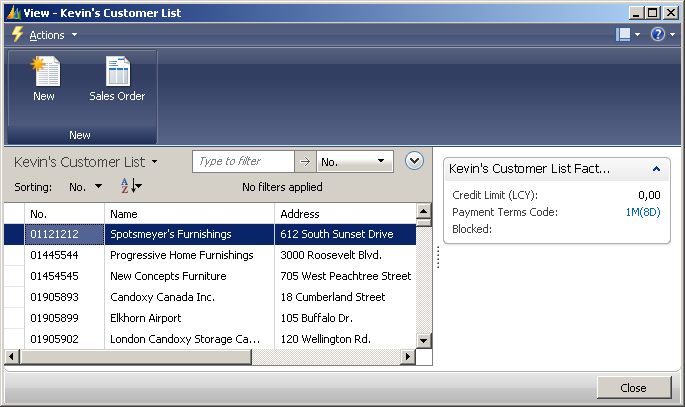
Kevin reviews the customer list page that Simon has created and has one last request. Kevin decides that he would like to display the credit limit and other relevant information for each customer when selected.
Creating a FactBox
Simon knows that he can use a FactBox to display the type of information Kevin is asking for on the customer list page. Simon creates a new FactBox page based on card part page type. He associates the page with the customer table and then adds the Credit Limit (LCY), Payment Terms Code, and Blocked fields to the FactBox.
 Note Note |
|---|
|
In this walkthrough, to learn about the properties and controls of FactBox, you will create a card part page from a blank page. If you are running Microsoft Dynamics NAV 2009 SP1, Object Designer also includes a wizard that you can use to create a card part page that sets up many properties and controls for you. For more information about the wizard, see How to: Create a Page. |
To create a FactBox to display credit information
-
In the Classic client, on the Tools menu, click Object Designer.
-
In Object Designer, click Page, and then click New. The New Page dialog box appears.
-
In the Table text box, click the AssistButton, select the table 18 Customer, and then click OK.
-
Click Create blank page, and then click OK.
The new page appears in Page Designer.
-
On the View menu, click Properties.
-
Locate the PageType property, and then set the Value field to the page type CardPart.
-
Close the Properties window.
-
In the Name field of the first row, which has the type Container and the subtype ContentArea, type CustomerListFactBoxContainer.
-
Select the second row.
-
On the View menu, click Field Menu.
-
Select multiple fields by holding down the CTRL key while you click the following fields:
-
Credit Limit (LCY)
-
Payment Terms Code
-
Blocked
-
-
Click outside the Field Menu window.
A message box appears with the following message: "Do you want to add the fields that are selected in the field menu?".
-
Click Yes.
-
Close the Field Menu window.
-
Press CTRL+S to save the FactBox page.
The Save As dialog box appears.
-
Specify an ID of 50001 and a Name of Kevin's Customer List Fact Box. Click OK.
-
To run the page, in Page Designer, select the page and click Run.
The RoleTailored client opens and displays the new FactBox page
Adding a FactBox to the Customer
List Page
Simon is now ready to add the FactBox to the customer list page that he created earlier. To do this, he first needs to open the customer list page in Page Designer and then add the FactBox to the bottom of the customer list page.
To add a FactBox to the customer list page
-
In Object Designer, click Page, select page 50000 Kevin's Customer List, and then click Design.
The Kevin's Customer List page opens in Page Designer.
-
Select the first empty line on the page, which is located immediately below the <Phone No.> field.
-
Click the Name column and type FactBoxArea. Set Type to Container and set SubType to FactBoxArea.
-
Select the FactBoxArea line and click the left arrow twice to negative indent this row until it is at the same level as the CustomerListContainer.
-
Click the next empty line in Page Designer and set the Type to a value of Part.
-
Open the Properties window.
-
Set the PagePartID property to Kevin's Customer List Fact Box by entering 50001 for the property value.
-
Set the SubFormLink property to No.=FIELD(No.).
NoteThe PagePartID property must be set before the SubFormLink property.
-
Save the page.
-
Run the page. The FactBox is displayed, as shown in the following screen shot.
See Also
© 2010 Microsoft Corporation. All rights reserved.